Skip to content
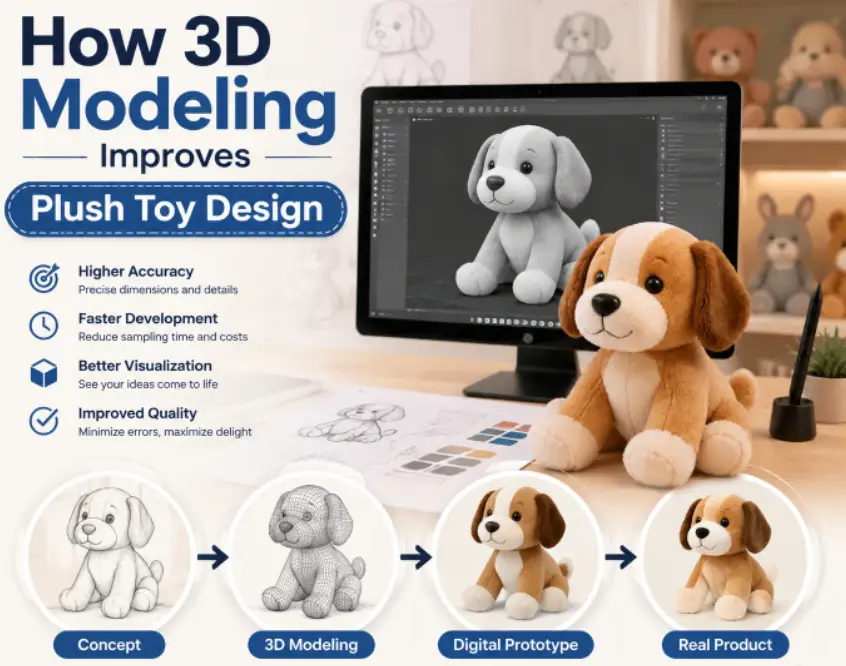
How 3D Modeling Improves Plush Toy Design is an essential step in modern plush toy development, allowing designers and manufacturers to transform creative ideas into accurate digital prototypes, optimise shapes and details, reduce production errors, and achieve better quality before moving into physical sample creation.
A practical look at how digital 3D modeling changes plush toy development — from proportion accuracy and fabric simulation to fewer sample rounds, better safety review, and faster designer-to-factory communication.
3D modeling has moved plush toy design away from a process built almost entirely on hand-cut paper patterns and trial-and-error sewing samples, and toward a workflow where proportions, seam placement, stuffing distribution, and safety features can all be tested on screen before a single piece of fabric is cut. For designers and brand teams, that shift means fewer wasted samples, more accurate character likeness, and a much faster path from concept sketch to an approved production-ready prototype.
This guide walks through exactly how 3D modeling changes each stage of plush toy development — pattern creation, fabric behavior, structural safety, licensed character accuracy, and communication between design teams and manufacturing floors — with reference data and practical tips designers can apply to their own projects.
The shift toward 3D-assisted plush design has accelerated as more studios need to shorten development timelines, manage larger multi-SKU product lines, and coordinate design approval across international teams and licensors. What used to be an almost entirely manual, physical process — sketch, hand-pattern, sew, review, repeat — now typically includes a digital planning stage that catches many of the same problems earlier, at far lower cost, before any fabric is committed.
What Does 3D Modeling Actually Mean for a Soft, Sewn Product?
Plush toys are soft goods, not rigid injection-molded parts, so 3D modeling for plush design works differently than it does for hard plastic products. Instead of modeling a single fixed shape, plush designers build a digital form that represents the toy’s stuffed, filled silhouette, then simulate how flat fabric panels wrap around that form once cut, sewn, and stuffed. The model has to account for fabric stretch, seam allowance, stuffing density, and the soft compression that happens when a child squeezes or hugs the finished toy.
In practice, this means a plush 3D model typically combines three linked elements: a sculpted reference form that captures the intended silhouette and proportions, a set of digitally unfolded pattern panels derived from that form, and a simulation layer that previews fabric drape, seam tension, and stuffing fill before any physical cutting begins. Some studios use dedicated garment and soft-goods simulation software; others adapt general-purpose 3D sculpting and CAD tools originally built for character animation or industrial design. Either way, the goal is the same: catch proportion, seam, and fit problems digitally, where they cost nothing to fix, rather than after a physical sample has already been sewn.
From Flat Sketch to Digital Form: How the Plush Design Workflow Has Changed
Traditional plush toy development starts with a 2D concept sketch, moves to a hand-drafted flat pattern, and only becomes three-dimensional once a sample maker sews and stuffs a physical prototype. Every proportion problem, every awkward seam, and every stuffing imbalance is discovered at that physical sampling stage — after fabric, thread, stuffing, and labor have already been spent. A 3D-modeled workflow inserts a digital step between the sketch and the first physical sample, so many of those problems are caught and corrected before any material is cut.
Traditional vs. 3D-Modeled Plush Toy Development Workflow
| Development Stage | Traditional Workflow | 3D-Modeled Workflow |
|---|---|---|
| Concept translation | 2D sketch interpreted manually by a pattern maker | 2D sketch used to build a 3D reference form with accurate proportions |
| Pattern creation | Flat pattern hand-drafted, adjusted through physical trial and error | Pattern panels digitally unfolded from the 3D form, pre-checked for fit |
| Proportion review | Only visible once the first physical sample is sewn | Reviewed on screen from multiple angles before cutting |
| Stuffing distribution check | Assessed by feel on a finished physical sample | Estimated with fill-volume and compression simulation |
| Design revisions | Requires a new physical sample for each meaningful change | Adjusted digitally, often without a new physical sample |
| Typical rounds to lock a design | 3–5 physical sample rounds | 1–3 physical sample rounds after digital refinement |
The practical effect of this shift is not that physical sampling disappears — a real fabric-and-stuffing sample is still needed to confirm hand-feel, fabric behavior, and stitch quality — but that the physical samples produced are far closer to the final approved design. Fewer rounds are spent correcting basic proportion or pattern errors, and more rounds are spent refining fabric choice, embroidery detail, and finishing quality.
How 3D Modeling Improves Proportion Accuracy and Character Likeness
Proportion accuracy is one of the hardest problems in plush toy design, especially for licensed characters or mascots where fans and brand owners will immediately notice if the head is too small, the limbs sit at the wrong angle, or the face reads as “off-model.” A 3D reference model lets a designer rotate the character in real time, check it from the front, side, and three-quarter angles, and compare it directly against reference artwork or an existing character sheet — something that is very difficult to do accurately from a single flat sketch.
Because a 3D model can be measured precisely, designers can lock exact ratios between head size, body width, limb length, and ear or feature placement, then carry those ratios through every size variant of the same toy — a 20 cm collectible version and a 45 cm floor version, for example — without the proportions drifting the way they often do when each size is separately hand-patterned. This is particularly valuable for plush toy lines with multiple SKUs at different sizes, since brand consistency across a size range is one of the most common points of failure in plush production.
Design Tip: Build the 3D reference model at the largest planned size in a product line first, then scale down digitally for smaller SKUs. Scaling down preserves proportion accuracy far more reliably than scaling up from a small reference, since fine details like eye placement and seam width don’t need to be re-estimated at a larger scale.

Multi-Angle Review Catches What Flat Sketches Miss
A flat concept sketch typically shows only the front view of a character, which hides problems that only become visible in three dimensions — a head that looks correct from the front but too narrow in profile, or an arm angle that reads naturally in a static drawing but looks stiff once stuffed and posed. Reviewing a 3D model from multiple angles during the design stage surfaces these issues while they are still cheap to fix, rather than after a physical sample reveals them.
Simulating Fabric Behavior and Stuffing Distribution Before Cutting Fabric
Fabric behaves very differently once it is cut, sewn into a three-dimensional form, and filled with stuffing than it does as a flat sketch suggests. Plush fabrics such as minky, short-pile plush, and sherpa each have distinct stretch, drape, and pile-compression characteristics, and stuffing density interacts with seam tension in ways that are difficult to predict without seeing the form filled out. Digital fabric simulation applies approximate stretch, weight, and drape properties to the 3D pattern panels so a designer can preview how a specific fabric type will behave once sewn and filled, before committing to a physical sample.
Common Fabric Simulation Parameters Used in Plush 3D Design
| Fabric Simulation Parameter | What It Represents | Design Decision It Informs |
|---|---|---|
| Directional stretch (warp vs. weft) | How much the fabric gives in different directions | Panel orientation on the fabric roll to avoid distortion at seams |
| Pile compression response | How pile height changes under stuffing pressure | Stuffing density needed to preserve intended silhouette softness |
| Seam tension estimate | Pulling force at seam lines once the form is filled | Seam allowance width and reinforcement stitching placement |
| Drape weight | How heavily the fabric falls or holds shape unsupported | Whether internal support (wire, boning, denser fill) is needed |
| Surface reflectivity/pile direction | How light interacts with pile nap direction | Panel layout to keep pile direction visually consistent |
Stuffing distribution is one of the areas where digital simulation delivers the clearest payoff. A plush toy that looks correctly proportioned as an empty pattern can still end up lumpy, under-filled at the extremities, or overly rigid at the seams once actually stuffed — problems that are notoriously hard to predict from a flat pattern alone. Fill-volume simulation approximates how stuffing will distribute through a given panel shape, helping designers identify areas that will need reinforced seams, internal baffles, or adjusted fill density before the first physical unit is ever stuffed.
Design Tip: Pay closest attention to fabric simulation results around narrow extremities — ears, tails, and thin limbs — since these are the areas most likely to show a mismatch between the digital model and the finished physical sample. Widening a seam allowance by even 2–3 mm in these zones during the digital stage is far cheaper than discovering the problem after cutting fabric.
Reducing Sampling Rounds and Development Cost With Digital Prototyping
Physical plush sampling is one of the more expensive and time-consuming stages of product development — each round typically requires cutting fabric, hand-sewing a sample, filling it, and shipping it for review, often across international time zones. Every design change that requires a new physical sample adds days or weeks to the schedule and consumes fabric, labor, and shipping costs that cannot be recovered. Catching proportion, pattern, and fit issues digitally before the first physical sample is cut directly reduces the number of these expensive iteration cycles.
Physical Sampling vs. 3D-Assisted Sampling: Time and Cost Comparison
| Development Metric | Physical-Sample-Only Workflow | 3D-Assisted Workflow |
|---|---|---|
| Typical days per sample round | 7–14 days (cutting, sewing, shipping, review) | 1–3 days for a digital revision review |
| Fabric consumed per revision | Full sample yardage per round | None until the design is digitally locked |
| Rounds typically needed to approve a new character | 3–5 physical rounds | 1–3 physical rounds after digital refinement |
| Cross-timezone review cycle | Physical sample must ship before review | Digital model reviewed remotely in real time |
| Cost concentration | Spread evenly across multiple physical rounds | Front-loaded into digital design time, lower overall spend |
This does not eliminate physical sampling entirely, and it should not — hand-feel, exact color match under real lighting, and stitch quality still need to be confirmed on an actual sewn unit. What changes is the purpose of that first physical sample: instead of testing whether the basic design works at all, it becomes a confirmation step for a design that has already been proven digitally, which means fewer total rounds and a shorter path to production sign-off.
3D Modeling for Pattern Grading and Seam Placement Accuracy
Pattern grading — scaling a single approved design up or down across a size range — is another area where 3D modeling reduces error compared to manual redrafting. When a pattern is hand-graded by scaling flat panel dimensions, small proportion distortions accumulate at each size step, especially around curved areas like the head, paws, or ears. Grading from a 3D model instead allows the software to recalculate unfolded panel shapes directly from the scaled three-dimensional form, which keeps curved seam lines proportionally accurate rather than simply stretched.
Seam placement also benefits directly from 3D review. Seams that fall in visually awkward positions — across a character’s face, through the center of an embroidered logo, or at a stress point that will bear repeated hugging pressure — are far easier to identify and reroute on a rotatable digital model than on a flat paper pattern, where the finished three-dimensional seam position has to be mentally extrapolated.
Design Tip: When grading a plush pattern across a size range, always re-check ear, paw, and tail proportions independently rather than assuming a uniform scale factor will look correct at every size — these features often need to scale at a slightly different rate than the main body to preserve the character’s likeness at smaller sizes.

Improving Safety Review and Structural Design Through 3D Modeling
Plush toy safety compliance depends heavily on structural details that are easy to overlook in a flat sketch — the exact placement of internal joints, the depth of stuffing needed to prevent choking-hazard access to internal components, and the pull strength required at attachment points for eyes, noses, and small trims. A 3D model makes it possible to visualize and measure these structural elements directly, which supports a more thorough safety and quality review earlier in the design process, well before a physical sample reaches formal lab testing.
How 3D Modeling Supports Structural and Safety-Related Design Review
| Safety-Relevant Design Element | Common Risk If Overlooked | How 3D Review Helps |
|---|---|---|
| Small part attachment points (eyes, nose, trims) | Insufficient pull strength; detachment risk | Visualizes attachment geometry and reinforcement area before sewing |
| Seam placement near stress zones | Seam failure under repeated handling | Identifies high-tension seam areas for reinforcement |
| Stuffing access points | Gaps that could expose internal filling | Models seam closure geometry to confirm full enclosure |
| Wire or armature placement (if used) | Sharp ends or exposed rigid components | Confirms internal component position stays within padded zones |
None of this replaces formal third-party lab testing against applicable toy safety standards, which remains a required physical step for any plush toy intended for retail or import. What 3D-assisted design review does is reduce the number of structural surprises that show up for the first time during that formal testing stage, since many of the same geometric and attachment issues can be visualized and corrected digitally beforehand.
3D Modeling for Licensed Character and IP-Accurate Plush Design
Licensed plush programs face a particular pressure that generic plush lines do not: a brand or IP owner will typically require sign-off on likeness accuracy before production begins, and that approval process is far more efficient with a 3D model than with flat sketches or early physical samples. A digital model can be directly overlaid against official character turnarounds or 3D brand assets supplied by a licensor, making it possible to check proportion, color, and feature placement against the source material with much greater precision than eyeballing a 2D sketch against reference art.
This matters commercially as well as creatively. Licensors typically require multiple rounds of likeness approval before authorizing production, and each round historically meant waiting for a physical sample to be sewn, shipped, reviewed, and — if rejected — revised and resampled. Reviewing a rotatable 3D model remotely allows a licensor’s brand team to approve or flag likeness issues in a single review session, often compressing what used to be a multi-week approval cycle into a matter of days.
Design Tip: When submitting a plush design for licensor likeness approval, include turntable views from at least four angles (front, three-quarter, profile, and back) alongside the standard front view — licensors frequently flag issues from angles that are rarely shown in a single hero image but matter once the toy sits on a shelf.
Software and Tools Commonly Used in Plush Toy 3D Design
Plush design studios use a mix of general-purpose 3D sculpting tools, dedicated soft-goods or garment simulation software, and standard 2D pattern-drafting programs that now increasingly integrate with 3D preview modules. Sculpting software is typically used to establish the reference silhouette and proportions; simulation software is used to preview fabric drape, stretch, and stuffing behavior on the derived pattern panels; and pattern software handles the technical output — seam allowances, notches, and cut-file specifications — that is ultimately sent to the factory floor.
The specific toolchain varies by studio size and budget, and there is no single required software stack for plush 3D design. What matters more than the specific program is whether the workflow actually connects the three stages — sculpting, simulation, and pattern output — into a single continuous digital thread, rather than treating 3D modeling as an isolated concept-visualization step that gets discarded once physical pattern drafting begins by hand.
How 3D Modeling Speeds Up Communication Between Designers and Manufacturing Teams
A significant, often underestimated benefit of 3D modeling in plush design is how much faster and clearer it makes communication between a design team and a manufacturing partner, especially when the two are working across language barriers and long distances. A rotatable digital model, annotated with exact measurements, seam positions, and stuffing density notes, leaves far less room for misinterpretation than a flat sketch accompanied by written instructions — and it can be reviewed instantly over email or video call rather than waiting for a physical sample to ship.
This is particularly valuable during the technical pack stage, where seam allowances, fabric panel counts, embroidery placement, and safety-relevant construction details all need to be communicated precisely. A 3D model paired with digitally unfolded pattern panels functions as a much more complete technical reference than a 2D sketch alone, reducing the number of clarifying questions and misaligned first samples that come back from a factory working purely from written specifications.
Fewer Miscommunications Mean Fewer Wasted Physical Samples
Because many first-sample errors originate from a factory team interpreting an ambiguous flat instruction differently than the designer intended, a clearer digital reference directly reduces one of the most common causes of a rejected first physical sample — not because the factory made a construction error, but because the specification itself was open to more than one interpretation.
Where 3D Modeling Fits Into a Realistic Plush Development Timeline
3D modeling is most effective when treated as an early-stage design and pre-production tool rather than a replacement for physical sampling altogether. A realistic plush development timeline typically still includes a hand-sewn confirmation sample, factory pre-production sample, and formal safety testing — but 3D modeling front-loads proportion, pattern, and structural review into the design stage, which is the cheapest point in the entire process to catch and correct a mistake.
The net effect across a full development cycle is not that 3D modeling removes steps from plush toy production, but that it shifts where problems get caught — earlier, cheaper, and with far less material waste — while still relying on physical samples and formal testing to confirm what a screen can’t fully replicate: how a fabric actually feels, how stitching actually holds, and how a finished toy actually performs in a child’s hands.
For design teams evaluating whether to invest in a 3D-assisted workflow, the clearest signal is usually the complexity and volume of the product line rather than the size of the studio. A single simple character with one size variant may see a modest benefit, while a licensed line spanning multiple sizes, multiple markets, and tight likeness-approval requirements tends to see the largest reduction in sampling rounds, revision time, and overall development cost.
Common Mistakes When Adopting 3D Modeling for Plush Design
Studios moving from a purely physical sampling process to a 3D-assisted workflow tend to run into a handful of predictable mistakes, most of which come from treating the digital model as a final answer rather than a planning tool. Recognizing these pitfalls early makes the transition to digital-first design far smoother.
Treating the Digital Model as a Substitute for Fabric Testing
The most common mistake is assuming that because a design looks correct in simulation, it will behave identically once sewn in real fabric. Simulation software approximates fabric properties using generalized parameters, but every fabric roll has small variations in stretch, weight, and pile behavior that a simulation cannot fully capture. Treating the 3D model as an approval-ready final design, rather than a strong starting point that still needs physical confirmation, is one of the fastest ways to end up with an unpleasant surprise at the first sample stage.
Skipping Multi-Angle Review
Because a 3D model can be reviewed from any angle, it’s tempting to approve a design based mainly on the front-facing hero view — the same angle a flat sketch would have shown anyway. This defeats much of the purpose of working in three dimensions. A disciplined review process checks profile, three-quarter, and back views as a standard part of every approval round, not an optional extra step.
Not Updating the Pattern Output When the 3D Form Changes
When a designer adjusts the 3D reference model late in the process — softening a curve, adjusting a limb angle — it’s easy to forget that the pattern panels need to be re-unfolded from the updated form. Sending an outdated pattern alongside an updated 3D reference to a factory is a common source of confusion, since the two documents no longer agree with each other. Keeping the pattern-output step tightly linked to the 3D model, rather than treating it as a one-time export, avoids this mismatch.
Ignoring Stuffing Density in the Digital Preview
It’s easy to build a visually pleasing 3D silhouette without accounting for how much stuffing density is realistically achievable in production at target cost. A digital model that assumes an unrealistically high fill density will look better on screen than the finished physical product ever will, setting up a mismatch between the approved digital concept and what the factory can actually deliver within the agreed cost and weight targets.
Frequently Asked Questions
Does 3D modeling replace the need for a physical plush toy sample?
No. 3D modeling reduces the number of physical sample rounds needed and catches many proportion, pattern, and structural issues before fabric is ever cut, but it does not replace physical sampling entirely. Fabric hand-feel, exact color match under real lighting conditions, stitch quality, and stuffing texture can only be confirmed on an actual sewn and filled sample. Formal safety testing also requires a physical unit regardless of how thoroughly a design has been reviewed digitally. The realistic benefit is fewer total physical rounds and a shorter path to an approved sample, not the elimination of physical sampling as a step.
How does 3D modeling improve proportion accuracy for licensed characters?
A 3D model can be rotated and measured precisely, allowing a designer to lock exact head-to-body, limb, and feature ratios and check them from multiple angles against official character reference art. This is much harder to do reliably from a single flat sketch, where proportion problems in profile or three-quarter view are often invisible until a physical sample is sewn. For licensed plush programs specifically, this precision also speeds up brand or IP owner approval, since a rotatable digital model can be reviewed remotely against source character assets in a single session rather than waiting on physical samples to ship for review.
What is fabric simulation, and why does it matter for plush toys specifically?
Fabric simulation applies approximate stretch, drape, and pile-compression properties to digital pattern panels so a designer can preview how a specific plush fabric — such as minky, short-pile plush, or sherpa — will behave once cut, sewn, and stuffed. This matters because plush fabrics behave very differently once filled with stuffing than a flat sketch or pattern suggests, and problems like uneven pile compression, seam pulling, or awkward drape at narrow extremities are much cheaper to identify and correct digitally than after a physical sample has already been cut and sewn.
Can 3D modeling help reduce plush toy sampling costs?
Yes, indirectly but significantly. Each physical sampling round consumes fabric, stuffing, and labor, and typically takes 7 to 14 days once cutting, sewing, and international shipping are factored in. By catching proportion, pattern, and structural issues at the digital stage, 3D modeling reduces the number of physical sample rounds needed to reach an approved design — often from three to five rounds down to one to three — which directly lowers material waste and shortens the overall development timeline, even though it does not eliminate physical sampling costs altogether.
How does 3D modeling support plush toy safety and structural design?
A 3D model makes it possible to visualize structural details that are easy to miss in a flat sketch, including the placement of small part attachment points such as eyes and noses, seam positions relative to high-stress handling areas, and whether stuffing access points are fully enclosed. Reviewing these elements digitally supports a more thorough internal design review before a physical sample reaches formal safety lab testing. It’s important to note that 3D review does not replace required third-party safety testing — it simply reduces the number of structural surprises discovered for the first time during that formal testing stage.
Is 3D modeling only useful for large or complex plush toy designs?
No. While the benefits are often most visible on complex licensed characters or multi-size product lines, even simple plush designs benefit from digital proportion checks, fabric simulation, and pattern grading accuracy. Smaller or simpler designs typically need fewer sample rounds either way, but 3D modeling still reduces the risk of proportion drift across size variants and helps catch basic seam or stuffing issues before physical cutting begins, regardless of how simple the character concept is.
What software or tools are typically used for 3D plush toy design?
Plush design studios generally combine general-purpose 3D sculpting software to build the reference silhouette, dedicated soft-goods or garment simulation tools to preview fabric drape and stuffing behavior, and 2D pattern-drafting software to generate the technical cut files and specifications sent to a factory. There is no single required tool, and the exact combination varies by studio size and budget. What matters more than the specific software is whether the sculpting, simulation, and pattern-output stages are connected into one continuous digital workflow rather than treated as separate, disconnected steps.