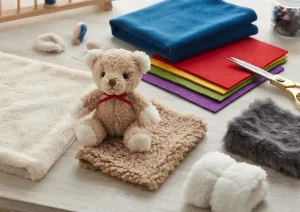
From Sketch to Stuffed Animal Toys: How Custom Plush Toys Are Created takes you through the complete journey of turning a simple idea into a fully crafted, high-quality plush product. A finished stuffed animal on a store shelf looks simple: soft fabric, a friendly face, a bit of stuffing.
But the distance between a designer’s sketch and that finished plush toy is longer and more technical than most buyers expect. A 2D drawing has no volume, no seam allowance, no fabric stretch, and no physical center of gravity — all of which have to be engineered into existence before a single stitch is sewn.
Buyers who are sourcing a custom plush toy for the first time often assume the process moves in a straight line from artwork to factory floor. In reality, it moves through a series of distinct technical stages, each with its own decisions, trade-offs, and failure points. Understanding those stages is what separates buyers who get a first sample that matches their vision from buyers who spend months revising a plush toy that never quite looks right.
This guide walks through exactly how custom plush toys are created, from the first sketch to the finished stuffed animal — covering pattern development, material selection, cutting and sewing, stuffing and shaping, and the quality checks that stand between a sample and a shippable product.
What Does the Journey From Sketch to Stuffed Animal Actually Involve?
The journey from sketch to stuffed animal is the process of converting a flat, two-dimensional design concept into a three-dimensional, manufacturable soft product that meets a specific look, feel, size, and safety standard. It is not a single step but a sequence of translation stages — design translation, pattern translation, material translation, and production translation — where information that exists only as an idea on paper has to be converted into something a factory can cut, sew, stuff, and inspect consistently across thousands of units.
Each translation stage introduces variables that were not visible in the original sketch. A character’s proportions that look charming on paper may not translate into a stable, sittable plush shape. A fabric texture described as “soft and fluffy” corresponds to dozens of different pile heights and fiber types, each with a different price and a different hand-feel. A facial expression drawn with a single pen line has to be recreated through embroidery density, appliqué placement, or safety-eye positioning — each of which changes the character’s expression in ways a sketch cannot predict.
Custom plush toy development exists to manage exactly this gap — turning an idea that is emotionally clear but technically undefined into a physical product that is technically precise and still emotionally faithful to the original concept.
How Does a 2D Sketch Become a 3D Plush Pattern?
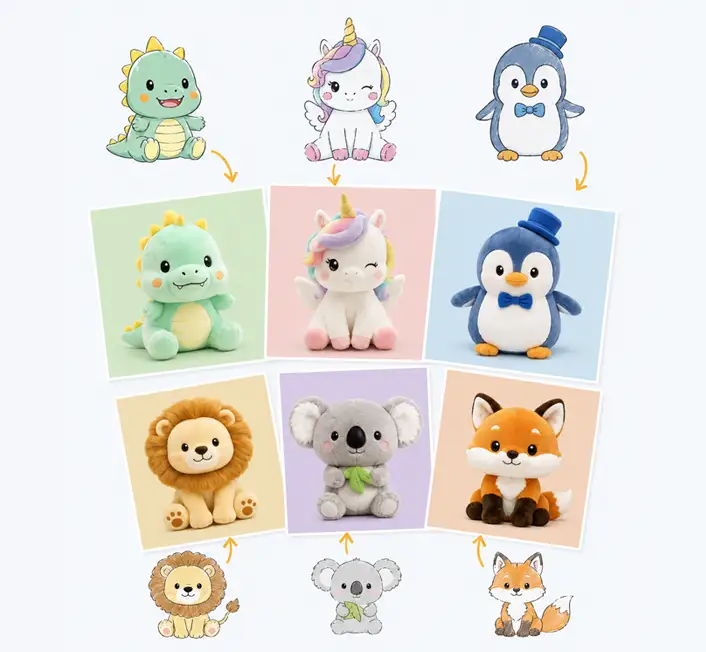
Pattern development is the stage where a flat character drawing is converted into the individual fabric panels that, once cut and sewn together, form the plush toy’s three-dimensional shape. This is arguably the single most technically demanding step in the entire process, because it requires a pattern maker to mentally reconstruct volume, curvature, and proportion from a drawing that only shows one or two angles of the design.
A 2D sketch becomes a 3D plush pattern through a structured pattern-making process: the pattern maker studies the character from all relevant angles, identifies the key proportional landmarks (head-to-body ratio, limb length, ear or feature placement), and drafts a set of flat panels — typically six to twelve pieces for a mid-complexity character — that will fold and seam together into the intended shape once stuffed. Each panel accounts for seam allowance, fabric stretch behavior, and the way stuffing will push outward once the piece is filled.
Core Stages of Plush Pattern Development
| Stage | What Happens | Why It Matters |
|---|---|---|
| Reference gathering | Multiple angles, proportion notes, and color references are compiled from the sketch | Prevents guesswork on parts of the design not shown in the original artwork |
| Panel drafting | Flat fabric pieces are drawn to form the character’s body, head, limbs, and features | Determines whether the finished shape will match the intended silhouette |
| Seam allowance calculation | Extra fabric margin is added around each panel for stitching | Insufficient allowance causes puckering; excessive allowance distorts proportions |
| Stretch and fabric behavior adjustment | Panels are resized to account for how the chosen fabric stretches once stuffed | The same pattern produces different final shapes on different fabrics |
| First pattern sample cut | Panels are cut from muslin or the actual fabric to test the fit before sewing | Confirms the pattern works before committing to a full sample build |
Tip: Share reference images from at least three angles — front, side, and three-quarter view — whenever possible. A pattern maker working from a single front-facing sketch has to guess at depth and proportion, and that guesswork is one of the most common reasons a first sample doesn’t match the intended design.
Why Proportions Almost Always Shift Between Sketch and Sample
It is extremely common for a first plush sample to look “slightly off” compared to the original sketch, even when the pattern maker has followed the reference art closely. This happens because a stuffed, three-dimensional object behaves differently from a flat drawing — heads that look proportionally large on paper can look oversized once filled with stuffing, and limbs that look slender in a sketch can look stubby once round volume is added. Experienced pattern makers routinely adjust proportions slightly away from the literal sketch specifically to preserve the character’s intended feel once it exists in three dimensions.
What Happens During the Prototype and Sample Development Stage?
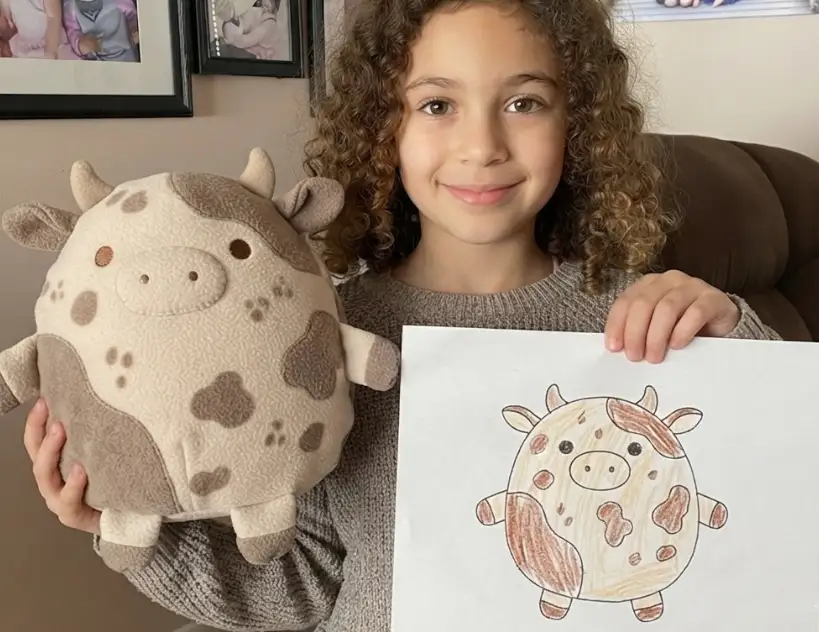
Sample development is the stage where the drafted pattern is cut, sewn, stuffed, and finished for the first time, producing a physical prototype that can be evaluated against the original design brief. This is the point at which a design stops being theoretical and becomes something that can be held, photographed, and assessed for accuracy, feel, and structural stability.
Sample development typically proceeds through a first proto sample, followed by one or more revision rounds, before a confirmed sample is approved for bulk production. The first proto sample is rarely the final approved version — it functions as a diagnostic tool that reveals where the pattern, material choice, or construction approach needs to be adjusted before the design is locked.
Typical Sample Development Sequence
| Round | Purpose | What Is Typically Adjusted |
|---|---|---|
| Proto sample (Round 1) | First physical build to test pattern accuracy and overall proportion | Silhouette, panel fit, feature placement |
| Revision sample (Round 2) | Corrects issues identified in the proto sample | Stuffing density, seam alignment, color matching |
| Fine-tuning sample (Round 3, if needed) | Refines details that affect brand consistency | Embroidery detail, fabric texture, accessory placement |
| Confirmed sample | Final approved version used as the production benchmark | Locked as the reference standard for bulk cutting and QC |
Tip: Request a physical confirmed sample — not just photos — before bulk production begins whenever the order size justifies the extra shipping time. Photos compress color accuracy and cannot convey stuffing firmness, fabric hand-feel, or scale, all of which are frequently the source of disputes after a large batch has already shipped.
Why Revision Rounds Are a Normal Part of the Process, Not a Failure
Buyers new to plush sourcing sometimes treat a requested revision as a sign that something has gone wrong. In practice, one to three revision rounds is the normal range for a moderately complex custom character, because a sketch simply cannot communicate every dimension a physical sample requires — exact color values, fabric hand-feel, stuffing firmness, and fine facial proportions are all easier to correct once there is a physical reference to react to than to specify perfectly in advance.
How Are Materials Selected for a Custom Plush Toy?
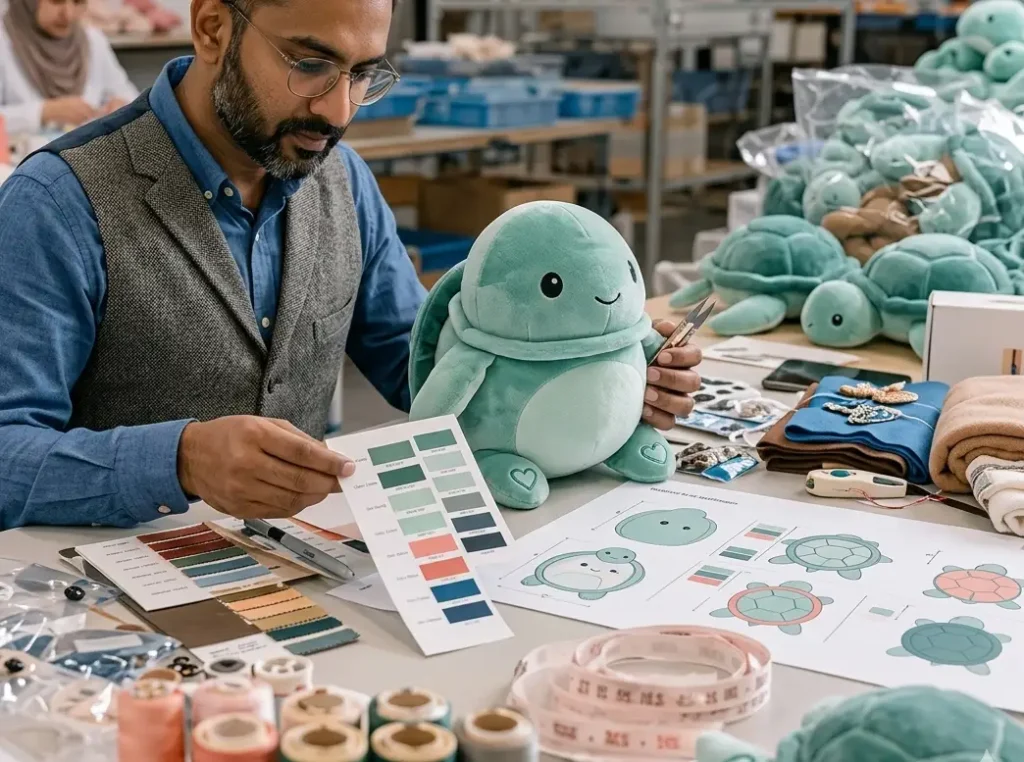
Material selection is the process of choosing the outer fabric, filling, safety components, and trims that will give the plush toy its intended look, feel, durability, and compliance status. Because materials account for a large share of a plush toy’s total production cost and are the most direct driver of how a toy actually feels in a customer’s hands, this stage carries as much design weight as the pattern itself.
Materials are selected by matching each design requirement to a specific fabric or filling specification: a design calling for a dense, huggable texture points toward a longer-pile minky or plush fabric with a higher-density filling, while a design calling for a sleek, low-profile look points toward a shorter-pile fabric with lighter filling. Every material choice also has to be checked against the compliance requirements of the target market before it is finalized.

Core Material Decisions in Custom Plush Development
| Material Element | Common Options | What It Affects |
|---|---|---|
| Outer fabric | Short-pile minky, long-pile plush, faux fur, brushed polyester | Texture, visual softness, price point |
| Filling | PP cotton, polyester fiberfill, weighted pellets (for weighted plush) | Shape retention, huggability, weight, and posability |
| Safety eyes and nose | Plastic safety-lock components, embroidered features (for young children) | Age-grade compliance and choking-hazard risk |
| Thread and stitching | Polyester thread at varying tensile strength | Seam durability under repeated play and washing |
| Trims and accessories | Ribbons, fabric patches, embroidered logos | Brand detail and finished appearance |
Tip: Ask for physical fabric swatches before approving a sample, not just fabric names. Terms like “soft plush” or “premium minky” are used inconsistently across suppliers, and the only reliable way to confirm a fabric matches your expectations is to feel it directly.
Matching Material Choice to Age Grade
The intended age range of the end user directly restricts which materials can be used. Plush toys intended for children under three years old generally require embroidered or fully secured safety features rather than small attachable components, denser stitching around any seam near stuffing, and filling materials that meet flammability and toxicity standards for the relevant market. Materials that are perfectly acceptable for an adult collectible or a promotional plush intended for older users may not be compliant for a toddler-facing product — which is why material selection and target-age definition need to happen together, not sequentially.
What Does the Cutting, Sewing, and Assembly Process Look Like?
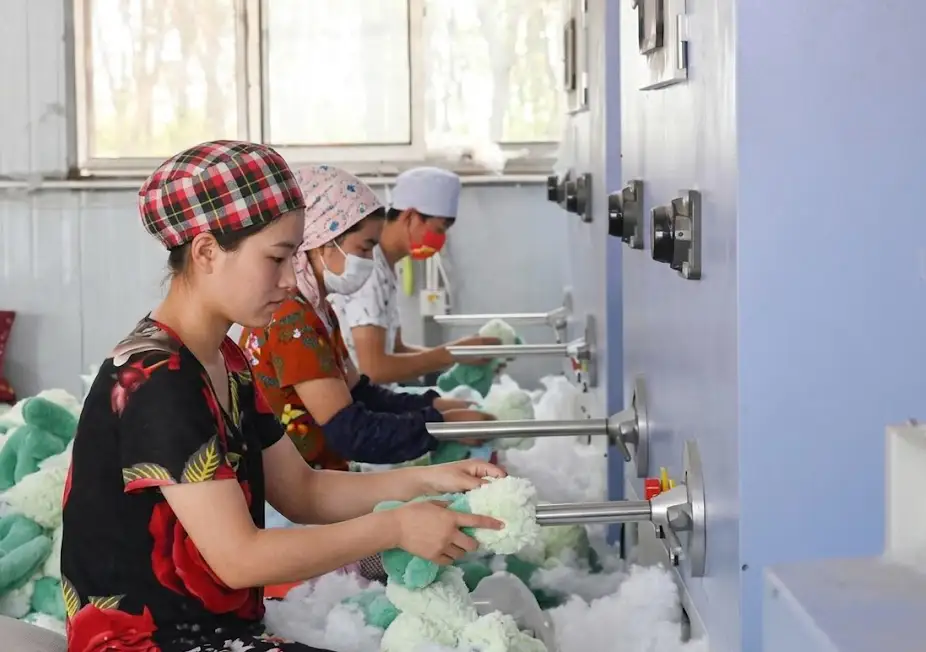
Cutting, sewing, and assembly are the production stage where the confirmed pattern is scaled up and repeated across the full order volume, converting individual fabric panels into finished, stuffed plush toys through a structured sequence of cutting, stitching, filling, and closing.
The process moves through a fixed sequence for almost every plush toy design: fabric is laid out and cut according to the confirmed pattern, the panels are sewn together in a specific order that leaves an opening for stuffing, the piece is turned right-side out, filling is added and distributed by hand or machine to the correct density, and the opening is closed with a ladder stitch or similar technique that leaves no visible seam.
Standard Plush Toy Assembly Sequence
| Step | Process | Common Quality Risk |
|---|---|---|
| 1. Cutting | Fabric is cut from the confirmed pattern, panel by panel | Fabric grain misalignment, inconsistent panel sizing |
| 2. Pre-sew detailing | Embroidery, appliqué, and face details are added before panels are joined | Misplaced or crooked facial features |
| 3. Sewing/assembly | Panels are stitched together, leaving a stuffing opening | Uneven seam allowance, weak stitch density |
| 4. Turning | The sewn piece is turned right-side out | Damage to small or intricate seams during turning |
| 5. Stuffing | Filling is added and distributed to achieve consistent firmness | Uneven density, lumping, under- or over-filling |
| 6. Closing | The stuffing opening is hand- or machine-stitched shut | Visible or weak closing seam |
| 7. Finishing | Trimming loose threads, brushing fur, attaching final trims | Inconsistent finishing across a batch |
Tip: Ask for a mid-production inspection at roughly 20–30% completion rather than waiting until the full order is finished. Stuffing density and stitching consistency are far cheaper to correct across a partial batch than after the entire order has already been packed.
Why Stuffing Density Consistency Is Harder to Control Than It Sounds
Stuffing is frequently underestimated as a simple filling step, but it is one of the more difficult processes to standardize across a large batch, particularly when it is done by hand. Workers naturally vary in how firmly they pack filling, and without a defined density standard and periodic spot-checks, the same design can come out noticeably firmer or softer from unit to unit within a single production run. Factories with mature quality systems address this by defining a target weight of filling per unit size and checking sample units against that target throughout the run, rather than relying on visual judgment alone.
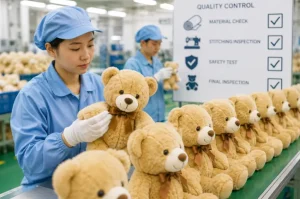
How Is Quality and Safety Verified Before Mass Production?
Quality and safety verification is the set of checks — visual, physical, and laboratory-based — applied to a plush toy before it is approved for shipment, confirming that the product matches the approved sample and meets the safety standards required for its target market and intended age group.
Verification happens at two distinct levels: in-line quality control, which checks stitching, stuffing, and appearance throughout the production run, and safety compliance testing, which checks the finished product against formal regulatory standards such as ASTM F963, EN71, or CPSIA, depending on the destination market. Both levels are necessary — passing visual inspection does not guarantee passing chemical or mechanical safety testing, and passing safety testing does not guarantee consistent visual quality across the batch.
Core Quality and Safety Checks Before Shipment
| Check Type | What It Verifies | Typically Performed By |
|---|---|---|
| Visual inspection | Stitching quality, color match, feature alignment, finishing | In-house QC or a third-party inspector |
| Pull testing | Attached components (eyes, noses, bows) resist a defined pull force | In-house testing lab or accredited third party |
| Stuffing weight check | Filling density is consistent with the approved standard | In-house QC during production |
| Chemical/material testing | Fabric and filling meet flammability and toxicity limits | Accredited third-party laboratory |
| Age-grade compliance review | All small parts and components meet the requirements for the stated age range | Compliance specialist or accredited lab |
Tip: Confirm the target age grade in writing before sampling begins, not after production. Age grade determines which safety standards and construction requirements apply, and changing it midway through development almost always requires re-engineering the safety features and can require a new round of testing.
How Long Does the Full Process Take From Sketch to Finished Plush Toy?
The overall timeline from an approved sketch to a finished, shipped plush toy depends primarily on design complexity, the number of sampling revisions required, and order volume — but a general range can be outlined for planning purposes.
Approximate Timeline From Sketch to Shipment
| Stage | Typical Duration | Key Variable |
|---|---|---|
| Pattern development | 3–7 days | Character complexity and reference clarity |
| First proto sample | 7–14 days | Material sourcing lead time |
| Revision rounds | 5–10 days per round | Number of rounds required to reach approval |
| Bulk production | 20–40 days | Order volume and current factory capacity |
| QC and compliance testing | 3–7 days | Whether testing runs in parallel with production |
| Total (typical project) | 6–10 weeks | Assumes one to two revision rounds |
Conclusion
The distance between a sketch and a finished stuffed animal is filled with technical decisions that are invisible in the original artwork — pattern proportions, fabric behavior, filling density, seam construction, and safety compliance all have to be engineered before a design becomes a physical product. Buyers who understand this sequence tend to get better first samples, spend fewer revision rounds correcting avoidable issues, and build a clearer working relationship with their development team.
Treating sample development as an iterative, expected part of the process — rather than something to rush past — is consistently what separates plush toy projects that launch on schedule and on-brand from those that stall in endless revision cycles.
FAQ
Q1: How many revision rounds should I expect before a plush toy sample is approved?
Most custom plush projects require one to three revision rounds before the sample is approved for bulk production, depending on character complexity and how detailed the original reference art is. Simple shapes with minimal facial detail often need only one round, while characters with intricate proportions, multiple fabric textures, or precise color matching typically need two to three rounds. Providing multi-angle reference art and physical color references at the start of the project is the most effective way to reduce the number of rounds needed.
Q2: Can a plush toy be produced without a physical sample stage?
It is technically possible to skip sampling and move directly to bulk production based on a digital rendering, but this is not recommended for any custom design beyond the simplest shapes. Digital renderings cannot show fabric behavior, actual stuffing firmness, or true color under different lighting, and any error discovered after bulk production has already begun is far more expensive to correct than an error caught at the sample stage. Sampling is a cost-control step, not an optional formality.
Q3: What is the difference between OEM and ODM plush toy development?
In an OEM (Original Equipment Manufacturer) arrangement, the buyer supplies a complete design — sketches, specifications, and often a full pattern — and the factory manufactures to that exact specification. In an ODM (Original Design Manufacturer) arrangement, the factory’s design team contributes to or leads the design process, often starting from an existing base pattern or concept that the buyer customizes. Buyers with a fully developed character design typically use an OEM approach, while buyers who need design support in translating a rough concept into a manufacturable product often benefit from an ODM relationship.
Q4: Why does my plush toy sample look different from my original sketch?
Some deviation between a flat sketch and a three-dimensional sample is normal and expected. A stuffed object behaves differently from a drawing — volume changes how proportions read, fabric texture changes how sharp or soft an edge appears, and small adjustments are often made by pattern makers specifically to preserve a character’s intended feel once it exists in three dimensions. Significant or unexplained deviations, however, should be raised directly with the development team and addressed in a revision round rather than accepted as unavoidable.
Q5: What information should I prepare before starting a custom plush toy project?
A well-prepared development brief typically includes multi-angle reference art or a 3D rendering if available, a defined target age grade, preferred fabric type and finished size, any specific color codes (such as Pantone references), the intended sales market (which determines applicable safety standards), and target order volume. Projects that start with this information defined upfront generally move through sampling faster and require fewer revision rounds than projects where these details are worked out during development.