Skip to content
Everything toy designers, product developers, and sourcing teams need to know about digital pattern making — from 2D CAD drafting and grading to nesting, file formats, and production handoff for plush toy manufacturing.
What Is Digital Pattern Making for Plush Toys?
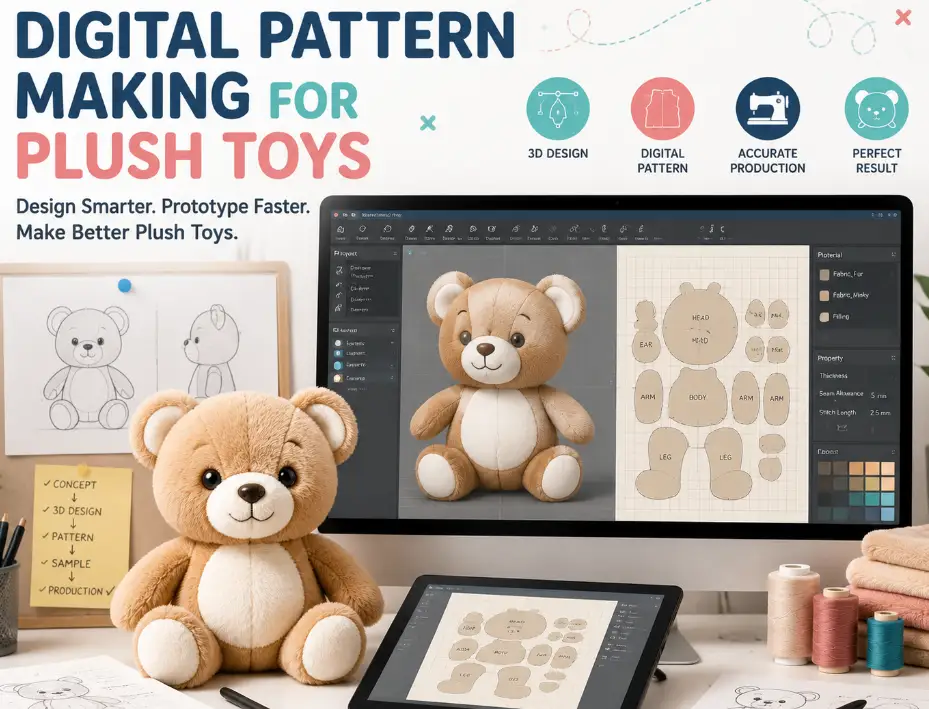
Digital pattern making is the process of drafting, grading, and finalizing plush toy sewing patterns using computer-aided design (CAD) software instead of cutting paper or cardboard templates by hand. Every panel of a plush toy — the body, head gussets, limbs, ears, and any appliqué pieces — is built as a precise digital shape with defined seam allowances, notches, grain lines, and fabric direction markers, then output as a print-ready or cutter-ready file.
What used to require a pattern maker’s table, shears, and a physical master pattern archive can now be completed on a single workstation, with every revision version-controlled and every size grade generated automatically from a base pattern. For plush toy development specifically, this shift matters more than it might for flat garment patterns, because plush relies heavily on three-dimensional shaping — darts, gussets, and curved seams that must align perfectly across dozens of panels to produce a symmetrical, well-proportioned finished toy.
This guide walks through how digital pattern making actually works for plush toys, what tools are involved, how grading and nesting function inside a digital workflow, and where the process still runs into real-world friction.
Digital Pattern Making vs Traditional Hand-Drafted Patterns
Before going deeper into the workflow, it helps to see how digital pattern making compares directly against the traditional hand-drafting approach that many smaller studios and legacy workshops still rely on.
Quick Comparison: Digital Pattern Making vs Hand-Drafted Patterns
| Criteria | Digital Pattern Making | Traditional Hand-Drafted Patterns |
|---|---|---|
| Drafting tool | CAD software (2D or 3D pattern design programs) | Paper, cardboard, French curves, manual rulers |
| Revision speed | Minutes per adjustment, instantly re-exportable | Hours; often requires redrafting affected panels by hand |
| Size grading | Automated, rule-based scaling across a size range | Manual grading, panel by panel, size by size |
| Fabric nesting/marker making | Software-optimized layout to minimize fabric waste | Manual layout, generally less material-efficient |
| Archiving and version control | Digital files stored, versioned, and instantly searchable | Physical patterns stored in folders or hanging racks |
| Cross-facility sharing | Instant file transfer to any factory or cutting room | Physical pattern shipping or manual re-tracing required |
| Best fit for | Multi-SKU lines, frequent updates, licensed characters | One-off samples, artisan or small-batch production |
How Digital Pattern Making Works: Software, Process, and Workflow
A digital pattern-making workflow generally begins with either a 2D concept sketch or a 3D character reference, and ends with a complete, graded, nested pattern set ready for cutting. The exact sequence varies by studio, but most professional plush pattern development follows a consistent structural logic.
Core Software Tools Used in Digital Plush Pattern Design
Flat pattern CAD programs are the backbone of most digital plush pattern work, allowing a pattern maker to draft panel shapes with exact curve geometry, add seam allowance offsets automatically, and place notches and grain lines with precision that is difficult to replicate by hand. Increasingly, studios also use 3D garment and soft-goods simulation software to drape a digital pattern over a virtual mannequin or character mesh before a single physical sample is cut, catching proportion and seam-alignment issues at the concept stage rather than after sewing a physical prototype.
Vector illustration software is commonly used alongside dedicated pattern CAD for surface graphics — printed or embroidered face details, brand marks, and appliqué shapes — which then get exported into the pattern file as reference outlines for placement accuracy during sewing.
From 2D Sketch to 3D-Simulated Prototype
The typical progression starts with a rough 2D silhouette sketch defining the character’s proportions, followed by a “flattening” exercise where the pattern maker mentally unwraps the 3D form into individual 2D panels — much like unfolding a globe into a flat map. Each panel is then drafted in CAD with precise curves, and where 3D simulation tools are available, the digital panels are stitched together virtually to preview how the fabric will drape, where fullness will pool, and whether seam lines will align cleanly before any physical cutting begins.

This virtual proofing step is one of the biggest efficiency gains digital pattern making offers over hand-drafting, since catching a proportion error in software costs minutes, while catching the same error after cutting and sewing a physical sample costs an entire sample cycle — often a week or more when working with an overseas production partner.
Tip: Run a virtual seam-alignment check on every panel boundary before releasing a pattern for physical sampling. Small curve mismatches that are invisible on screen at full-pattern zoom often become visible puckering once the fabric is actually sewn.
Key Components of a Digital Plush Pattern
A production-ready digital plush pattern is far more than an outline — it is a complete technical document containing every instruction a cutting room and sewing line need to reproduce the design consistently across thousands of units.
Seam Allowances, Grading, and Nesting
Seam allowance is added digitally as a precise offset around each panel’s finished-size outline, typically ranging from 3 to 8 millimeters depending on fabric thickness and seam type. Grading — the process of scaling a base pattern up or down to produce a full-size run — is handled through defined grade rules applied automatically across every panel, ensuring that a small, medium, and large version of the same character maintain consistent proportions rather than simply being scaled uniformly, which often distorts smaller or larger sizes unnaturally.
Nesting, sometimes called marker making, arranges all pattern panels across the fabric width as efficiently as possible to minimize scrap. Digital nesting software can test dozens of layout permutations in seconds, a task that would take a human pattern maker considerable time to optimize manually, and even modest nesting efficiency gains compound significantly across a large production run.
Digitizing Fur Direction and Panel Placement
Plush fabrics — faux fur, minky, velboa, and similar pile fabrics — have a distinct nap direction that must be marked and respected during cutting, or the finished toy will show visibly mismatched fur direction across seams. Digital patterns encode this as a directional arrow or grain line on every panel, and cutting software (particularly automated fabric cutters) can read that grain data directly to orient each panel correctly during nested cutting, removing a common source of manual cutting error.
Tip: Always digitize nap direction as a locked, non-rotatable attribute on fur and pile-fabric panels within the nesting software. If nesting software is allowed to freely rotate panels to save fabric, it will optimize for material yield at the expense of consistent fur direction unless this constraint is explicitly set.
Pattern Grading and Multi-Size Digital Scaling
Grading is one of the areas where digital pattern making delivers the clearest advantage over manual methods, since a single set of grade rules can generate an entire size range from one validated base pattern. The table below illustrates typical grading increments used across common plush toy size categories.

Typical Digital Grading Increments by Plush Size Category
| Size Category | Base Height Range | Typical Grade Increment | Grading Consideration |
|---|---|---|---|
| Mini/keychain plush | 10–20 cm | 2–3 cm per step | Small panels are highly sensitive to grading error; manual review recommended |
| Standard plush | 20–40 cm | 3–5 cm per step | Most common range for automated grade-rule application |
| Large plush | 40–70 cm | 5–10 cm per step | Seam allowance and stuffing volume must scale proportionally, not just outline size |
| Jumbo/floor plush | 70 cm and above | 10–20 cm per step | Structural panels (gussets, internal seams) often need custom grade rules, not linear scaling |
A key nuance in plush grading, unlike flat garment grading, is that features like eye placement, ear size, and facial proportion often should not scale linearly with the body. A character’s eyes scaled up by the same percentage as its body frequently look oversized or distorted at larger plush sizes. Experienced digital pattern makers apply non-linear or feature-specific grade rules to preserve the character’s intended proportions across the full size range.
Tip: Grade facial features and body panels using separate rule sets rather than a single uniform scale factor. Reviewing a printed comparison of the smallest and largest graded sizes side by side, before cutting any samples, catches proportion drift early.
Digital Pattern Making and Production Efficiency
Beyond design accuracy, digital pattern making has a measurable effect on production timelines and fabric utilization, both of which directly influence unit cost at scale.
Production Impact of Digital Pattern Making
| Metric | Typical Improvement vs Manual Methods | Primary Driver |
|---|---|---|
| Pattern revision turnaround | From days down to hours | Digital edits propagate instantly across all affected panels |
| Fabric utilization (nesting efficiency) | Several percentage points of material savings | Software-optimized panel layout across fabric width |
| Sample-to-approval cycles | Reduced by catching proportion issues in 3D simulation | Virtual proofing before physical cutting |
| Cross-factory handoff time | Near-instant file transfer vs physical pattern shipping | Standardized digital file formats |
| Size-range development time | One base pattern generates a full graded set automatically | Rule-based digital grading |
These efficiency gains are most pronounced on multi-SKU product lines and licensed character programs where the same base character is produced across several sizes, color variants, or seasonal updates. A single well-built digital pattern effectively becomes a reusable asset rather than a one-time drafting exercise.
File Formats and Digital Pattern Compatibility
Digital patterns need to move cleanly between design software, factory cutting rooms, and automated cutting equipment, which makes file format compatibility a practical, not just technical, consideration.
Common Digital Pattern File Formats and Their Use
| File Format | Primary Use | Compatibility Notes |
|---|---|---|
| DXF (AAMA/ASTM) | Industry-standard pattern exchange format | Widely supported across most CAD and cutting systems; the most common handoff format |
| PLT (HPGL) | Plotter output for full-size paper pattern printing | Used when a physical paper pattern is still needed for manual cutting or reference |
| Native CAD project files | Editable master files retaining all grade rules and layers | Not universally compatible; typically stays internal to the design team |
| Reference printing, approval documentation, tech packs | Not cutting-ready; used for communication rather than production | |
| Cutter-native formats | Direct input for automated fabric cutting machines | Often generated from DXF; format varies by cutter manufacturer |
When working across multiple factories or subcontracted cutting rooms, standardizing on DXF as the primary exchange format tends to minimize compatibility friction, since it is broadly supported regardless of which specific CAD platform each party uses internally.
Common Challenges in Digital Pattern Making for Plush
Despite its advantages, digital pattern making for plush toys is not without friction points. Software-drafted curves can look mathematically perfect on screen while still behaving differently once translated into a real, three-dimensional pile fabric with its own stretch, loft, and drape characteristics — a gap that experienced pattern makers close through physical sample validation rather than trusting simulation alone. Fabric-specific variables like fur pile height, stretch percentage, and stuffing compression are difficult to model with full accuracy in software, meaning digital patterns still typically require at least one or two rounds of physical sampling before being locked for production.
Another recurring challenge is maintaining consistency between the digital pattern’s seam allowance assumptions and what actually happens on the sewing line, where hand-guided stitching can introduce small variances that a purely digital process does not account for. This is why the most reliable plush development workflows treat digital pattern making as the foundation of the process rather than a full replacement for physical prototyping and fit review.

Choosing a Digital Pattern Workflow for Your Plush Project
The right level of digital investment depends on the scale and complexity of the product line. A few practical guidelines help match the workflow to the project:
- Single small-batch or one-off design: Basic 2D CAD drafting is often sufficient; full 3D simulation may not justify the setup time.
- Licensed character with a defined art style: Invest in accurate digital grading and 3D proofing to protect proportion consistency across every size and SKU.
- Multi-size product line: Prioritize well-built grade rules, including non-linear rules for facial features, over simply scaling a single base pattern.
- Program with multiple manufacturing partners: Standardize on a widely compatible exchange format such as DXF from the outset to avoid rework during factory handoff.
In every case, digital pattern making works best as a discipline layered on top of solid fundamental pattern-making skill, not as a substitute for it. The software accelerates drafting, grading, and revision cycles, but the underlying judgment about proportion, seam placement, and fabric behavior still comes from experienced pattern development.
Frequently Asked Questions
Q1. What software is typically used for digital pattern making in plush toys?
Most studios use dedicated 2D pattern CAD software for drafting panel shapes, adding seam allowances, and generating grade rules, often paired with 3D garment or soft-goods simulation tools for virtual draping and proportion checks before physical sampling. Vector illustration software is also commonly used alongside these for surface graphics like facial details and appliqué placement references.
Q2. Does digital pattern making eliminate the need for physical sampling?
No. Digital pattern making significantly reduces the number of sampling rounds needed by catching proportion and seam-alignment issues in software first, but it does not fully replace physical sampling. Fabric-specific behavior — pile height, stretch, drape, and stuffing compression — is difficult to model with complete accuracy in simulation, so at least one or two rounds of physical prototyping are still standard practice before a pattern is locked for production.
Q3. How does digital grading handle facial features differently from body panels?
Unlike simple linear scaling, digital grading for plush toys often applies separate, feature-specific grade rules to elements like eyes, ears, and facial proportions rather than scaling them by the same percentage as the overall body. This is because features scaled uniformly with body size frequently look distorted or oversized at larger plush dimensions, so experienced pattern makers set independent grading logic to preserve the character’s intended look across the full size range.
Q4. What file format is best for sharing plush patterns across different factories?
DXF, based on the AAMA/ASTM pattern exchange standard, is the most widely supported format for transferring digital patterns between different CAD platforms and cutting systems. It minimizes compatibility issues when working with multiple manufacturing partners who may use different internal software, making it the practical default for cross-factory pattern handoff.
Q5. How does digital nesting reduce fabric waste?
Digital nesting software tests many possible panel layout arrangements across the fabric width in a short amount of time, optimizing for minimal scrap in a way that would be far slower to achieve through manual layout. Even modest percentage-point improvements in nesting efficiency compound meaningfully across large production runs, directly reducing material cost per unit.
Q6. Why does fur direction matter in a digital plush pattern, and how is it handled?
Pile fabrics like faux fur and minky have a distinct nap direction, and mismatched fur direction across seams is noticeable on a finished toy. Digital patterns encode nap direction as a grain line or directional marker on each panel, and this data can be locked as non-rotatable within nesting software so that automated layout optimization does not sacrifice consistent fur direction in favor of marginal fabric savings.